Showing posts with label cuttings. Show all posts

Monday, June 6, 2016

Propogating Plantlets En Mass

It's been AWHILE since my last entry, for the purely simple reason that my gardening time has been taken up by my non-succulent plants! I think I will cave and post all gardening stuff up here. I'm just doing too well with the dahlias!

This photo spread is a look at the "nursery" I set up in my mini-greenhouse. Some of the plants are cuttings, some are plants developing from dropped leaves, and some are just little plants, like my baby butterfly kalanchoes that grew on the leftovers from my deadheading of the pink plants.

Wanted to show the spray bottle, because I've found it's by far the BEST way to water plantlets and small cuttings. I got the spray bottle at Daiso Japan, my favorite "dollar" store (most items are actually $1.50). I set it to mist and then I mist the hell out of the plants. I want it looking like a Stephen King flick, at least for a millisecond. I'm done when everybody's all shiny and the soil is dark.

Most of these little guys are what I call "self-starters" or "accidental" propagation. Once a month, or just when I'm weeding, I look for dropped leaves that have started to grow into plants. Some succulents are so delicate the leaves just drop off when you brush them, so it's careful work to reach in and pick out the leaf with its plantlet and pink roots. I gotta be totally honest. I was at my parents' this weekend. I went through some of my mom's pots and stole her self-starters! Only five... besides, she container-gardens. No room for the plants to expand. I'm giving them life! Wink, wink. Emoji needed here.

If you take a look at this particular photo, you'll see that to the far right and center left are TWO BABY BUTTERFLY KALANCHOE PLANTS! These guys came from the leftover stems I had stuck in the dirt! They grew without leaves, so I popped them off their stems and after giving them a day or so to callous, set them in this wet, enriched soil. Weird thing; I've got three of the baby butterflies in here right now, and only the smallest one has developed roots at this point.

The aeonium above is the popular canariense variety, and is the last of about five cuttings I took the last time I "reorganized" that plot of plants. The other cuttings grew roots splendidly and have been popped in the ground with the rest of the succulent patch. Amazing to think they were cut off of plants that I bought originally at the size of the tiny cutting!

Sometimes you get strange growth. At the bottom center of the photo is a fuzzy little guy from my OTHER awesome kalanchoe, the fang plant. It's grown roots, but it doesn't seem to be developing a plant. It happens. Since it already has roots, I'm giving it a chance to turn into a "real" plant. This photo mostly contains ghost plant, jelly bean, and Fred Ives.

The Fred Ives plant has blown my mind. I bought one plant three years ago, and now I have at least ten fully-grown offshoot plants! An example of it is the orange-green rosette looking sideways at the center right. Fred Ives are one of those rainbow varieties, and while they aren't my FAVORITE, they are great to keep putting around the patch! Their plantlets grow REALLY weird, and always look wavy and wrong when tiny. I have two in my doll head pots right now. The other doll head has a ghost plant baby.

My original Fred Ives echeveria.
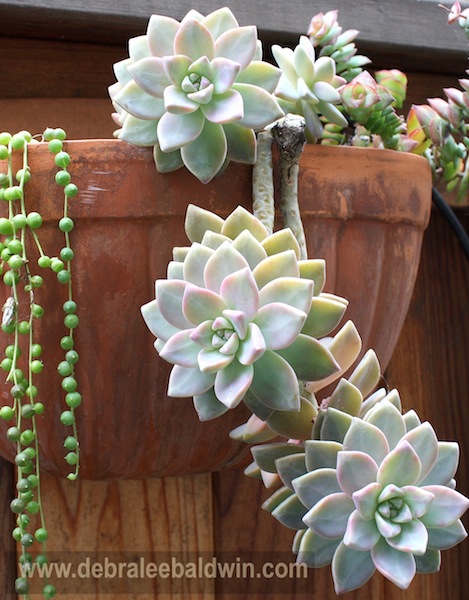
Here is a lovely ghost plant picture from the queen of succulents, Debra Lee Baldwin. Just look at those colors! Very excited about all my little ones!


Sunday, April 3, 2016

Closing the Circle (no, this is not a Wiccan thing)

Aeonium rosettes cut cleanly from the mother plant.
This morning I did a little plant trimming and moving to complete the circle of aeoniums around my agave marginita. I started by cutting aeonium rosettes, then found that I had a smaller plant I could pull out and replant, as well as a rosette that had rooted.
This plant could be pulled out of the circle without leaving a large gap.

This little guy had already formed its own roots, so was a perfect choice.


In the larger plant I pulled, you can see how the long, brown stem would stand out as rather ugly in less dense foliage. This is a reason to deadhead a plant, and you would cut the stem off cleanly as closely to the "head" as possible.

Closing the gap. You can see I left some space for the agave where I had trimmed off leaves.
 I dug holes and planted the two rooted plants in the gap where the Mexican feather grass bush had been. They nearly enclose the space as is, but in less than a year will be dense enough with new growth to complete an entire circle around the agave.
Planted and watered.

After I planted the rooted plants, I got lazy. Because the aeoniums grow so prolifically, I wasn't too worried about coddling the two cuttings I had made. I set them in place lightly on top of the soil after I watered it for the rooted plants. Hopefully, without too much intervention from me, they will naturally callus and create a root system for themselves. It's worked before; these aeoniums are tough suckers!

Cuttings placed lightly balanced on the other plants so they won't touch soil directly.
The small plant in front/in back of the agave and aeoniums needs me to do some research on it (it was a gift), but I'm hoping it will be a small tree.

Friday, April 1, 2016

Deadheading: It's Not As Bad As It Sounds

There comes a time in most succulent's lives where you're going to have to cut off their heads. Don't worry, it sounds a lot worse than it really is.

Grew under some portulaca, was reaching for the sun.
Most succulent plants look best without long stems. However, most succulents will grow extremely long stems the longer they are alive, which can look awkward. There are also conditions a plant may grow in which cause it to stretch when it should be dish-shaped, and dead-heading is great for these plants, too.

I used a dead stem to prop up the plant heads so they'll grow straight.
Today, I finally cut off the heads of my pink butterfly kalanchoes. This plant, which originally was one, is now three (I gave one to my mother), and the two remaining had stems nearly two feet long. The stems reached horizontally along the ground so the plants could get into the bright sunshine. Not very attractive, so, I cut them off.

The bottom of the stem is close to, but not touching the soil.
You want to use a very sharp knife, preferably as clean as possible. Once you've beheaded your plant, place it in a pot hovering JUST ABOVE some moist soil. This encourages the plant to grow roots to reach that soil. With this plant, the long "leaves" provide a prop to keep the stem from touching.

It usually takes a few weeks for the plant to grow new roots. Yes, you can just cut some heads off and stick them in the ground, but they won't necessarily root that way, and they may rot. For plants you really love, take it slow.


There's a tiny pink plantlet to the right of the pot!
The "leftovers" aren't necessarily useless, either. The rooted stem, once the head of the plant is removed, might begin growing small plantlets where leaves formerly grew, or even at the top where the "head" was removed. Since I had to cut the stem into more than one piece (it was THAT LONG), I threw them all in a pot together with the rooted bits to give them a chance to make some babies.


I don't know how this will turn out, but I'm hoping that at least the "heads" of the plants will root successfully, as they are some of my favorite. The little pink plantlets are just gorgeous, and unlike other mother-of-thousands plants, cannot grow into plants themselves.
The two rooted stems and the other cut pieces.
The Results!